
This set of some of the most popular Instant Pot Freezer Meals on the web can be prepped and in the freezer in just hours - easy recipes for busy families! You can use any electric pressure cooker to cook and this set includes printable grocery list and meal labels.

I am so excited that, after a full summer of sharing the most popular recipes from my many freezer meal sets, today is the day to combine them all into one big freezer meal session!
Since June, I've shared the top 10 most popular recipes from the following plans...
- Original Instant Pot Freezer Meal Boot Camp
- Mini Instant Pot Freezer Meal Boot Camp
- Fall Soups Instant Pot Freezer Meal Boot Camp
- Cleaner, Healthier Instant Pot Freezer Meal Boot Camp
- ...and, even one recipe from my Premium Packs
These were voted on by members of my Instant Pot Freezer Meal Facebook group, email subscribers, and general feedback I've received over the past couple of years. Since I know so many of you love doing batch freezer prep as much as I do, I'll be sharing full instructions on how to get these all in the freezer in just a couple of hours. Make your next few weeks so easy by doing just an afternoon of work!

This is going to look pretty familiar if you've ever done one of my other boot camps - the general instructions are the same, but customized to these meals. Let's get going!

First, a little summary of the Instant Pot. It is a…
- pressure cooker
- slow cooker
- steamer
- yogurt maker
- saute pot
- rice cooker
- warmer
Basically, most anything you can do in the kitchen can be done with this little guy. My favorite thing about it is having the ability to cook foods from frozen (I’m talking frozen-to-table in an hour or two) and how little you have to babysit it. Especially if you have kids that have busy after school schedules, this is so convenient. I also love that just about any slow cooker recipe can be prepped in the Instant Pot in a fraction of the time. The one draw-back I’ve seen is that you can’t get foods browned or crispy with the Instant Pot…but that can easily be fixed by popping your dish under the broiler to finish!
It lends itself so perfectly to freezer meals…which is the inspiration behind all of this meal planning! As soon as I bought it I knew it had huge potential to save tons of time in the kitchen. Since I started making boot camps, thousands of readers have used these methods and recipes in their kitchen with a lot of success. I love hearing that my boot camps have made your time in the kitchen quicker and easier!
OTHER NOTES:
- NPR stands for natural pressure release. That means, instead of immediately releasing the pressure from your Instant Pot after the cooking time is up, give it about 10 minutes to release on its own. Then, flip the nozzle and release the pressure (careful though…that’s pressurized steam coming out!)
- QR stands for quick release. That means you release the pressure and open the pot as soon as the cooking time is over.
- So, if you’re reading my cooking labels, you’ll often see that the directions look like this: “manual, high pressure, 100 minutes, NPR.” That means you’ll use the manual setting on your pot to put in 100 minutes yourself, then let the pot have a natural pressure release (for about 10 minutes) after the pot beeps when that 100 minute cycle is over. But, like I said, you’ll use the soup button on all 5 of these recipes.
- You will set the same time on your Instant Pot for frozen and non-frozen meals. So, let’s say there’s a meal or two you decide not to freeze and just store in the fridge for a day or two. Don’t adjust your cooking time! I know that seems kind of weird, but the pressurizing process thaws your frozen meal. The time that it takes your pot to come to pressure will be much longer for frozen meals (I found it to be around 20-25 minutes for a frozen meal, depending on the size of what’s frozen, as opposed to 5-10 minutes usually for a non-frozen dish).
Now that we’ve gone over the lingo, let’s start the prep process!
Step 1: Get your supplies ready.
This is the key to making this process as easy as possible. You don’t need a ton of supplies for this (besides your Instant Pot, obviously…this is a link to my model). The main purchase I’d urge you to make is a set of storage containers that fit into your Instant Pot. That way, you can freeze your meals in the containers, thaw them just enough to pop them out of the container, and drop the frozen meal in the Instant Pot to prep (this way, it will fit in the pot without thawing)!
This set from the Dollar Tree is perfect. You might be able to find them in store if you don’t want to pay shipping, or this set of deli containers from Amazon works too. I would go on and get 10-15 of them if you can get your hands on them…I’ve reused my original ones from Dollar Tree a few times, so they’re well worth the investment! If you choose to buy just a couple of containers, you can set gallon freezer bags in the containers to kind of shape your meals to fit in the pot while freezing them. Just set the bag into your container, put in your ingredients, and freeze the bag while still in the container so it retains the shape needed to fit into the Instant Pot while still frozen.
Go on and make sure you have your bag/container labels printed (scroll down for those labels) and cut…be ready to label those as soon as you finish making the meals (before they go in the freezer). I recommend sticking the labels on with packing tape, so make sure there’s a roll of that handy. There’s also a specialty Freezer Tape available that’s made for sticking labels onto freezer dishes and has incredible reviews.
I also recommend ensuring that you have enough freezer space before you ever get started. If you’re planning on doing freezer meals for any period of time, I highly recommend a small chest freezer like this one. It’s not a huge investment and it has been super useful for us over the years.
Summary: Make sure you have:
- Instant Pot-shaped containers (One set is more than enough for this boot camp.)
- Labels (scroll down for printables)
- Packing Tape or Freezer Tape
- Gallon Freezer Bags
- Freezer space
I strongly recommend these optional (but very convenient) accessories if you’re going to be freezer Instant Pot cooking…
- An extra Instant Pot inner pot insert (so you can still prep dinners even when your other pot is dirty/in the fridge storing something else).
- An inner pot lid (helps you use your inner pot as storage after dinner!)
- An extra Instant Pot sealing ring (food flavors can really soak into the silicone sealing ring that’s tucked in your lid of your pot. I have two rings…one for savory foods and one for sweet. That way, my sweet foods don’t end up tasting funky!)
- A food chopper to make veggie prep easier.
Step 2: Make your grocery run.
Instead of making your own grocery list from each of the recipes, I’ve done the work for you!
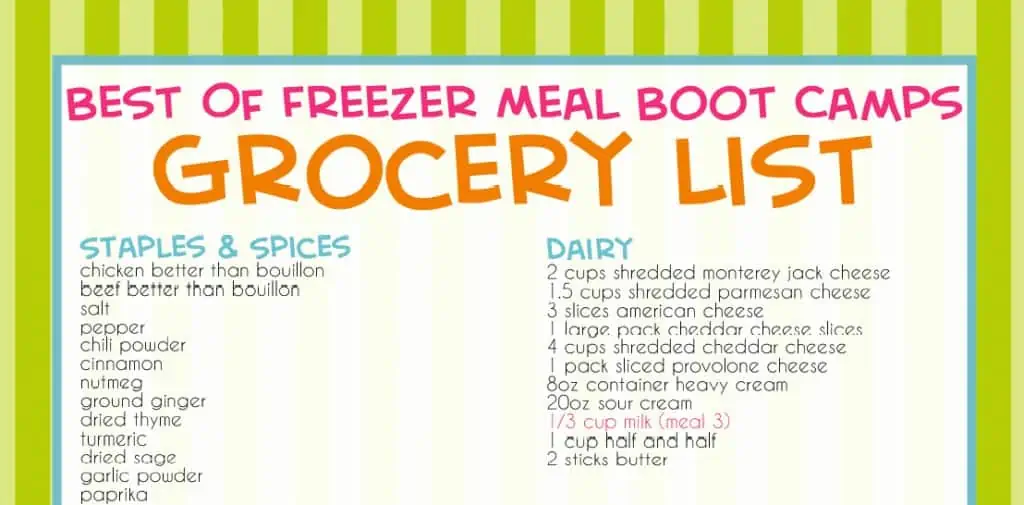
I have a full grocery list for this boot camp (including things you’ll need for serving day and side items) in the printable collection of my blog…that’s exclusively available to my newsletter subscribers. You can sign up (for free!) by clicking here to get download instructions for the grocery list right to your email inbox. While you’re visiting the printable collection, can also grab a fully printable version of boot camp – this file is formatted like my premium Freezer Meal Boot Camp packs so you can really get a feel for what these popular meal planning sets are like! And this set is totally free once you sign up with your email. (If you're already a subscriber, check the bottom of your latest newsletter from me for the link and password!)
For purchasing your groceries, I am a huge fan of using Walmart’s Grocery Pickup service for bigger trips like this…just order your items online using the grocery list I have in the printable collection and pickup from your local store at no extra charge! It’s incredibly convenient and a great way to organize your groceries to ensure you get everything. Click here to get a $10 off coupon for trying it out!
Step 3: Print and cut your labels.
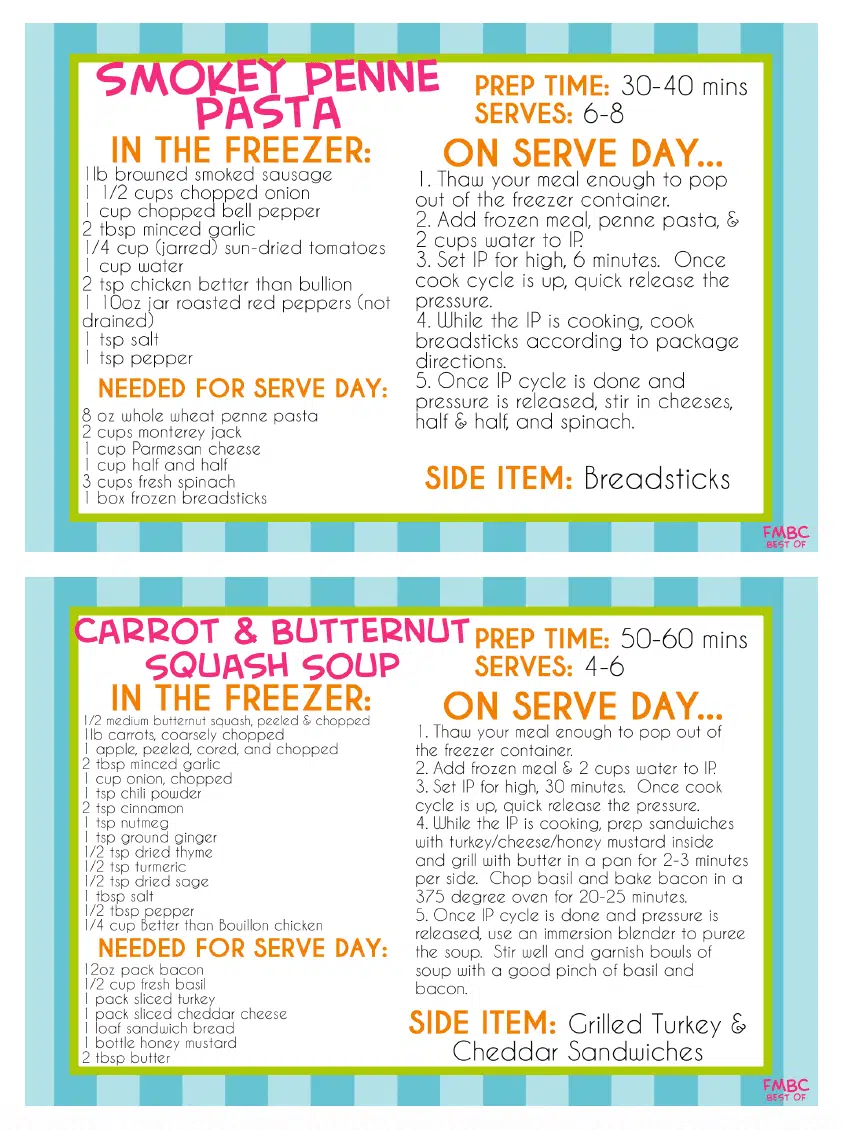
The labels you’ll download below have every bit of info you’ll need for serving day. Just stick these on your freezer containers as you prep your dishes! I’ve included the recommended side dish, prep instructions from frozen, and extra ingredients you’ll need on serving day. (You should already have these extra items if you follow the grocery list above...they're the ones highlighted in pink.)
Click here to download your labels.
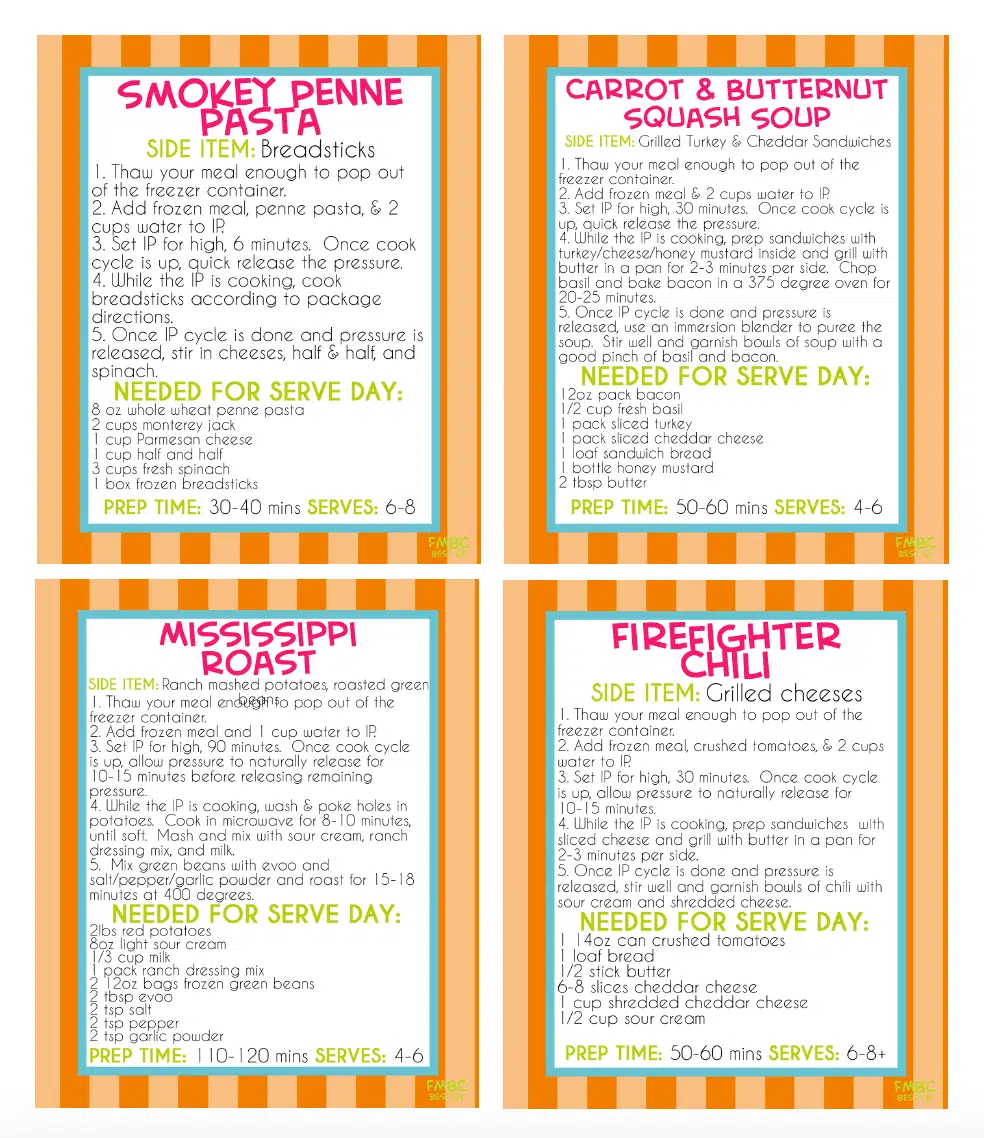
I get a lot of requests for full recipe cards for the meals, so I've started putting those in each of my boot camps. These contain all of the info you’ll need for replicating the recipe, side dishes, serve day instructions, and estimated servings/cook time (whereas the smaller labels just have the instructions/ingredients you need for serve day). You can find the individual ones by clicking the links on each recipe in the instructions below, or download them all at once by clicking the following link...
Click here to download recipe cards for each meal.

After the labels are printed, just cut them out (I love this paper cutter for making the process easier) and have them ready to attach to your containers with packing tape or painter’s tape before you freeze. I made the mistake of waiting until after they were frozen to try to attach the labels…doesn’t work. The frost made the tape fall right off. So make sure they’re labeled before they ever go in the freezer.
Step 4: Prep your veggies.
Alright, you’ve got your supplies, you’ve got your groceries, you’ve got your labels…it’s finally prep time!
Here’s the order in which I prepped all of the veggies for the meals:
- slice and blanch 2lbs red potatoes (boil in water for 2-3 minutes)
- chop 9 onions (or 3 lbs)
- chop 1 green bell pepper
- chop 1 red bell pepper
- remove leaves from 3 sprigs rosemary
- peel and chop 1 medium butternut squash
- peel and coarsely chop 1lb carrots
- peel and dice 8 sweet potatoes
- peel, core, and chop 1 apple
- de-stem and chop 3 cups kale
Once this is all done, I find a larger area of my counter and set out all of the veggies buffet-style to make for easy assembly. I also use a Vidalia Chop Wizard (c/o) to make this process much, much easier.
Step 5: Prep your meat.
You’re going to cook/prep some of the meat before freezing. Here’s the order of how I prepared the meat part of the meals…
- brown and drain 1lb smoked sausage
- cook and drain 1lb + 3 strips bacon
- brown and drain 2lbs ground beef
- brown and drain 1lb country sausage
- brown and drain 1lb ground turkey
- brown and drain 1lb Italian sausage
You’ll also put these out buffet-style for assembly. I recommend having a separate part of your counter if possible for the meat to prevent cross-contamination.
Step 6: Put everything together!
Now it’s time to assemble your meals!
Meal 1: Smokey Penne Pasta
In your freezer container:
1lb browned smoked sausage (all of the smoked sausage)
1 ½ cups chopped onion (roughly ⅙ of the chopped onion)
1 cup chopped bell pepper (all of the chopped green bell pepper)
2 tablespoon minced garlic
¼ cup (jarred) sun-dried tomatoes
1 cup water
2 teaspoon chicken better than bullion
1 10oz jar roasted red peppers (not drained)
1 teaspoon salt
1 teaspoon pepper
Meal 2: Carrot & Butternut Squash Soup
In your freezer container:
½ medium butternut squash, peeled & chopped (all of the chopped butternut squash)
1lb carrots, coarsely chopped (all of the chopped carrots)
1 apple, peeled, cored, and chopped (all of the chopped apple)
2 tablespoon minced garlic
1 cup onion, chopped (roughly 1/7 of the remaining chopped onion)
1 teaspoon chili powder
2 teaspoon cinnamon
1 teaspoon nutmeg
1 teaspoon ground ginger
½ teaspoon dried thyme
½ teaspoon turmeric
½ teaspoon dried sage
1 tablespoon salt
½ tablespoon pepper
¼ cup Better than Bouillon chicken
Meal 3: Mississippi Roast
In your freezer container:
3lb chuck roast
6oz (half a jar) of pepperoncini peppers, with juice
1 stick of butter (no need to melt)
1 pack of ranch dressing mix
1 pack brown gravy mix
Meal 4: Firefighter Chili
In your freezer container:
1lb bacon, cooked and drained (all of the cooked bacon, reserving 3 pieces for later)
1lb country sausage, cooked and drained (all of the cooked country sausage)
1lb ground beef, cooked and drained (half of the cooked ground beef)
2 cups chopped onion (roughly ⅓ of the remaining chopped onion)
1 red bell pepper, chopped (all of the chopped red bell pepper)
2 tablespoon minced garlic
2 packs chili seasoning
1 can chili beans (not drained)
1 10oz can diced tomatoes & green chiles
8oz tomato sauce
2 teaspoon better than bouillon beef
2 teaspoon salt
2 teaspoon black pepper
2 teaspoon garlic powder
Meal 5: Italian Beef Sandwiches
In your freezer container:
1 3lb boneless chuck roast
10-12 pepperoncini peppers, ¼ cup juice from jar
2 packs Italian dressing mix
2 teaspoon better than bouillon beef
Meal 6: Beef Ragu
In your freezer container:
1 cup chopped onion (roughly ¼ of the remaining chopped onion)
3 tablespoon minced garlic
3 sprigs fresh rosemary (all of the rosemary)
3 lb boneless chuck roast
1 teaspoon salt, 1 teaspoon pepper
2 teaspoon better than bouillon beef
1 28oz can diced tomatoes
1 6oz can tomato paste
Meal 7: Turkey & Sweet Potato Chili
In your freezer container:
1lb cooked ground turkey (all of the cooked ground turkey)
1 diced sweet potato (⅛ of the chopped sweet potato)
1 cup chopped onion (⅓ of the remaining chopped onion)
1 can chick peas
1 can chili beans
1 can Rotel
14 oz of diced tomatoes
1 teaspoon better than bouillon chicken
1 pack chili seasoning
Meal 8: Zuppa Toscana
In your freezer container:
2lbs sliced red potatoes, sliced and blanched (all of the blanched red potatoes)
1cup chopped onion (half of the remaining chopped onion)
1 tablespoon minced garlic
3 slices bacon, crumbled (all of the remaining cooked bacon)
1lb Italian sausage (cooked) (all of the cooked Italian sausage)
2 teaspoon better than bouillon chicken
3 cups kale (all of the chopped kale)
Meal 9: Carnitas Over Sweet Potato Mash
In your freezer containers:
Container 1:
3lb pork butt
1 tablespoon salt
1 tablespoon pepper
1 teaspoon paprika
1 teaspoon chili powder
1 teaspoon garlic powder
Container 2:
7 sweet potatoes, peeled and chopped (all of the remaining chopped sweet potatoes)
2 tablespoon brown sugar
1 teaspoon salt
1 teaspoon pepper
1 teaspoon cinnamon
1 teaspoon chili powder
Meal 10: Taco Soup
In your freezer container:
1 lb ground beef, cooked and crumbled (all of the remaining ground beef)
1 cup chopped onion (all of the remaining chopped onion)
15.5oz can pinto beans
15.5oz can kidney beans
15oz can whole kernel corn (not drained)
10oz can Rotel
4oz can green chiles
½ 4oz can black olives, sliced (optional)
1 pack taco seasoning
1 pack Ranch dressing mix
And that's it! Once those are in the freezer, you have 10 delicious, popular Instant Pot meals ready to go.

Click here to check out all of the boot camps posted on the blog and click here to see the premium versions.
