
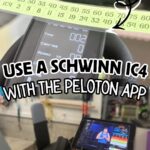
This post shows how to use a Schwinn IC4 Spin Bike to get a DIY Peloton cycling dupe. Includes supplies needed, how to get cadence and resistance measurement conversions, and what apps are used on an iPad.
Paid links used in this post. Read more about my link usage policies.
Today, I want to show some of the new ways I'm making my experience in using a Schwinn IC4 as close to using an actual Peloton dupe as possible. I still fully believe it's possible to get a DIY Peloton bike workout without paying the Peloton price. Let me show you how.
My Backstory
A little bit of background: I mentioned in my half garage gym post that I'm a bit of a gym rat. I put daily workouts into my routine a few years ago, and it's one of the best things I've ever done for myself.
About two years ago, I discovered Peloton. I started doing the tread and bike workouts with the equipment at my gym and loved the energy and pace of the workouts. I've tried a lot (and I mean a LOT) of workout apps/programs. There's no question this is the best one for me.
When the pandemic hit, my husband and I decided that going to a gym wasn't going to be in the cards anytime soon. So, we set out to put together our home gym. One of my priorities in our gym setup was a place to do the many workouts available on the Peloton app (treadmill, bike, strength training with weights, and yoga, just to name a few).
We already had a treadmill, so that part was taken care of. I knew that I loved Peloton spin workouts, but just couldn't pull the trigger on paying over $2000 for a piece of workout equipment (plus another $40 a month for the monthly membership). I loved it, but not quite that much. 🙂
So, I started researching.
I found the Peloton subreddit, which had several posts raving about the Schwinn IC4 as a lower-cost dupe of the Peloton. That led to the Schwinn IC4 Facebook group, which has taught me basically everything I'm putting in these posts. All credit goes to those geniuses!
The IC4 has a similar magnetic resistance to the Peloton (making it both quiet and durable) and measures bike output (via cadence and resistance) in a similar way to the Peloton, sending that info to the device of your choice via bluetooth. The subreddit/group claimed that, with the right setup, there isn't much this bike can't do that the Peloton does. I was intrigued.
Where to Buy a Schwinn IC4
As of early 2023, the IC4 is almost always available on Amazon. If you can't find it there, here's a list of other retailers (again, not always in stock at these either, but keep checking back):
- Best Buy
- Dick's Sporting Goods (use their email sign-up to get a 15% off coupon)
- Directly from Schwinn (shipping takes awhile, usually 6-8 weeks)
- Target
We got our bike in May 2020 and, since then, I've done so many DIY Peloton bike workouts this way. And I can honestly say I don't regret this purchase one bit. As a matter of fact, it's some of the best money I've ever spent!
Schwinn IC4 vs Peloton
There are a few small differences in the Schwinn IC4 vs Peloton. To sum it up, they are very minimal. Overall, you need to ask yourself if those differences are worth over a few hundred extra in setup and an extra $30 a month. To me, that answer is a huge no.
The big difference in riding through the Peloton app vs on an actual Peloton bike is the ability to be on the leaderboard. If you're not familiar with Peloton, it ranks the people that are doing a live ride (and I believe on demand as well) on a leaderboard by their total output in a ride. App riders don't appear on this leaderboard, so you won't get your actual ranking in the app or be seen by other riders to get high fives.
This really isn't a huge deal. I've found that competing against yourself (by trying for higher output in the same amount of time) is much more motivating than competing against others. You will be able to see others that are currently taking a class though.
This also means you can't do synced-up rides with friends directly through the app. Peloton users have the ability to ride with others, even giving you a video chat option. Of course, you can just set up a time with a friend to do this on the IC4 and FaceTime - it's just not possible through the actual bike.
If you're in any Peloton groups (yes, they are a thing), you can't search by hashtag to see who else in your group is riding. I am in Sweat Squad (a really fun group on Facebook), but I can't search the hashtag #sweatsquad when riding to see who else is there. (And I believe they can't see you either.)
You don't have the ability to search rides by song, workout equipment, or name. So, if you're wanting to do a strength workout that uses resistance bands, you're going to have to work a little bit harder to find it. Lucky for us, somebody put this together - it's a spreadsheet with tons of older Peloton rides, including equipment, artists, songs, and even difficulty rankings. It's amazing!
One final thing - you can't see your output or resistance in the app after you do your workout (it does show heart rate and cadence). Those will all be in Mpaceline though, so it's not a big deal at all.
Really, those are the only things I've found that I can't do. If those things are worth an extra few hundred dollars in setup and $30 a month, that's totally ok, it's your money! Some people need different things for motivation, and I can see a lot of this being really fun to have. They just personally weren't worth it for me.
Peloton Workout Organization
In the past, I used the Apple reminders app to build my workout plan for each week, but now, Peloton has that functionality built right into the app. Planning my workouts in advance is so helpful - I don't even have to think about what to do each day. A quick look at how I do that...
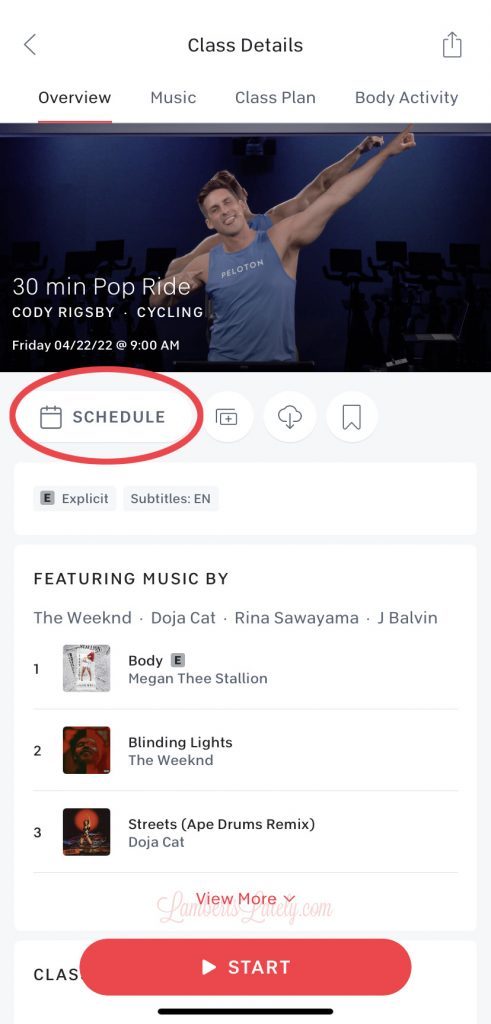
First, navigate to the workout you'd like to schedule. Click the big "schedule" button right below the image.
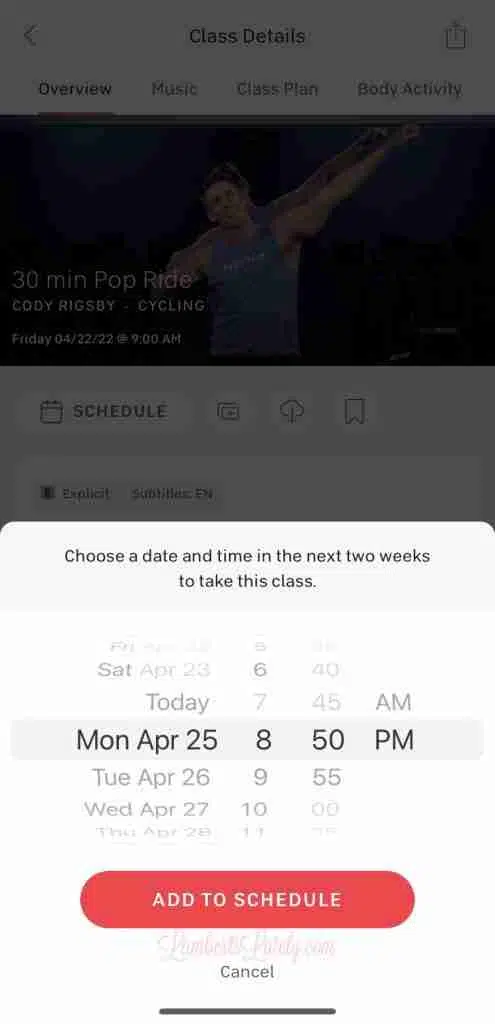
Put in a time later in the day (after you plan on working out) for your schedule. If you really want, you can put in the exact time you plan on working out (the app will send you a notification right before you're scheduled to start), but I never really know what time I'll be able to exercise, so I just pick a time late in the day so it doesn't disappear on me.

Now, navigate to the main classes page and click the "schedule" button at the top.
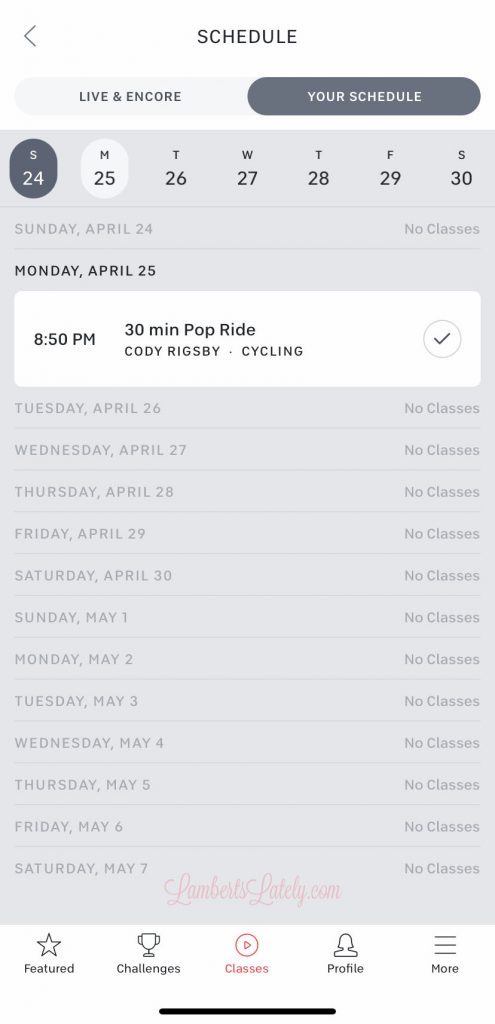
Click "Your Schedule" on the right. Your workout is on your schedule now! You can do this for up to 2 weeks in advance.
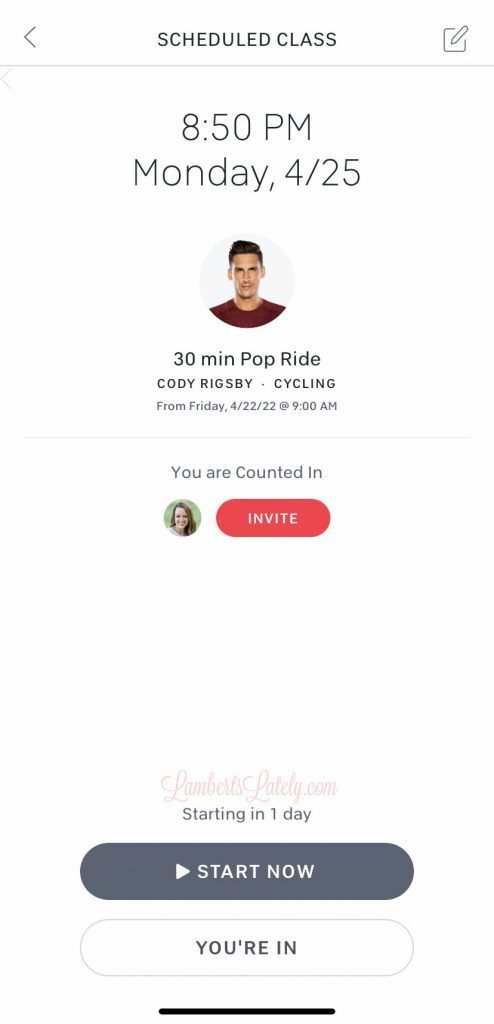
When you're ready to do a workout, just click on it from the "Your Schedule" page and click "start now," even if it's not your scheduled workout time.
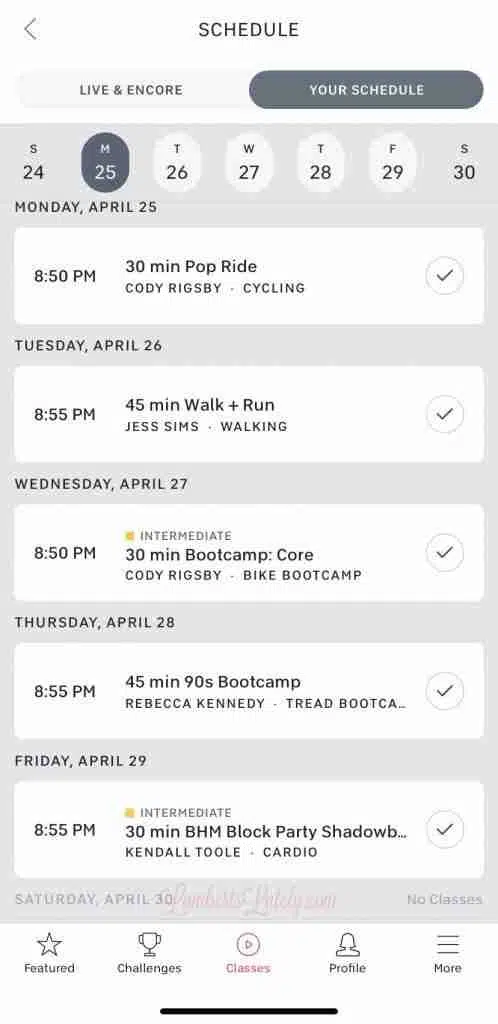
Here is an actual look at a week of workouts for me. This was a little bit heavier on Peloton workouts than normal because I wasn't planning on going to the actual gym this week (I use the Fitbod app to plan those workouts). I like to do a mix of strength and cardio, with both running and cycling in there...really just a little bit of everything!
How to Setup a DIY Peloton Dupe
Let's dive into how you can duplicate this DIY Peloton bike setup at home!
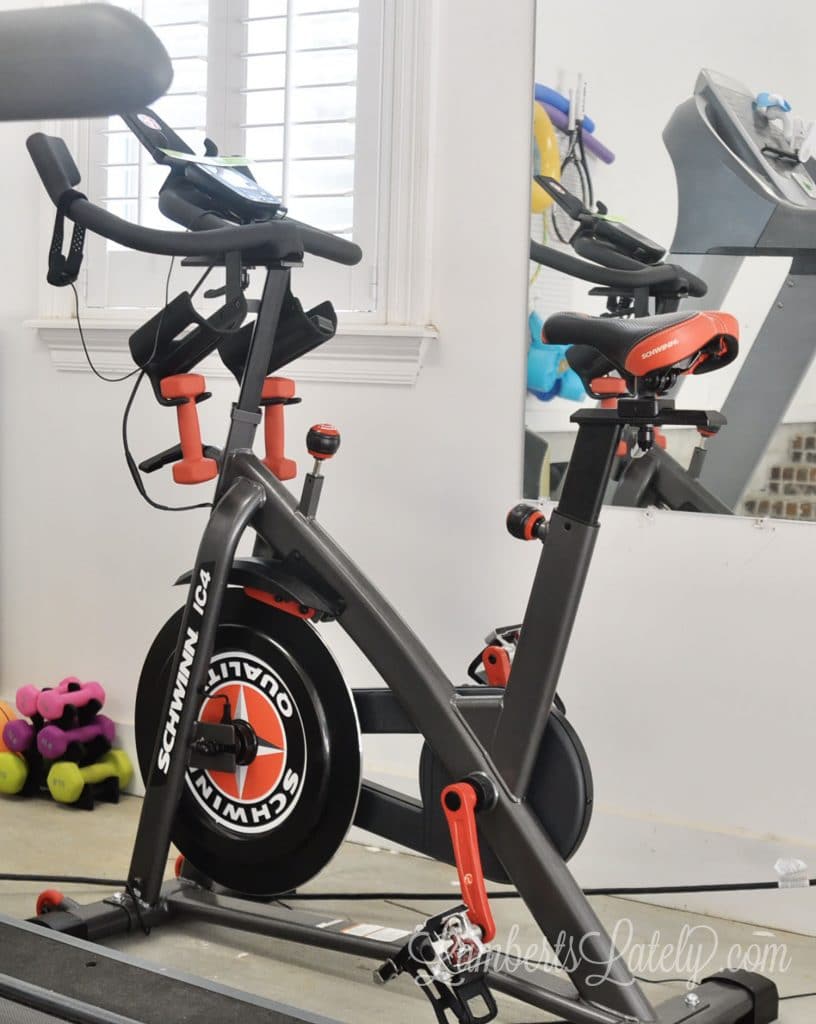
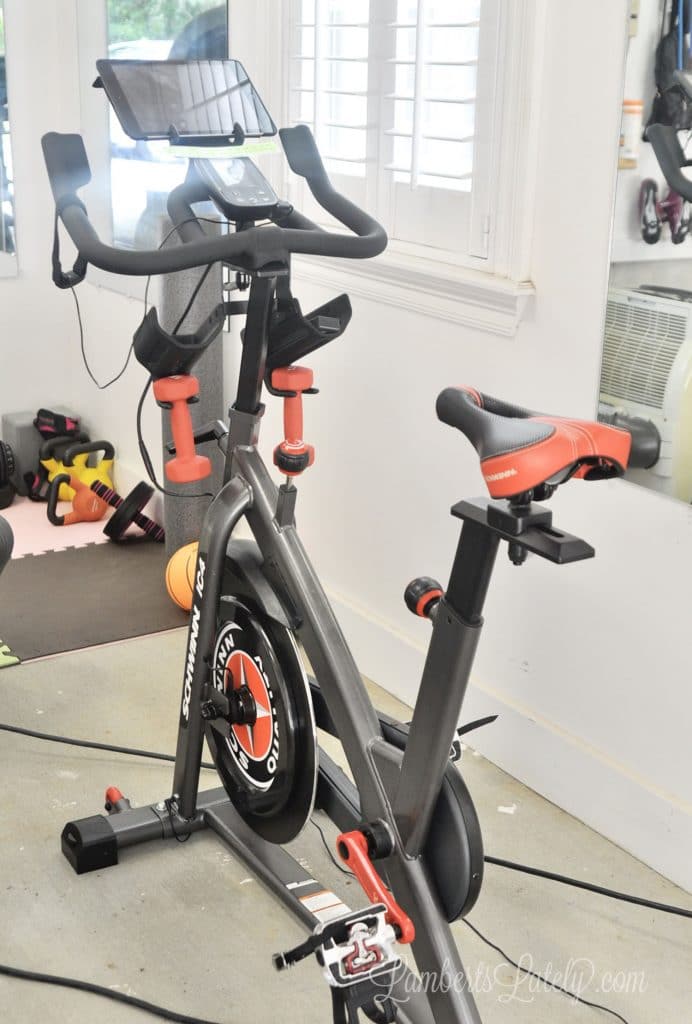
Equipment Needed:
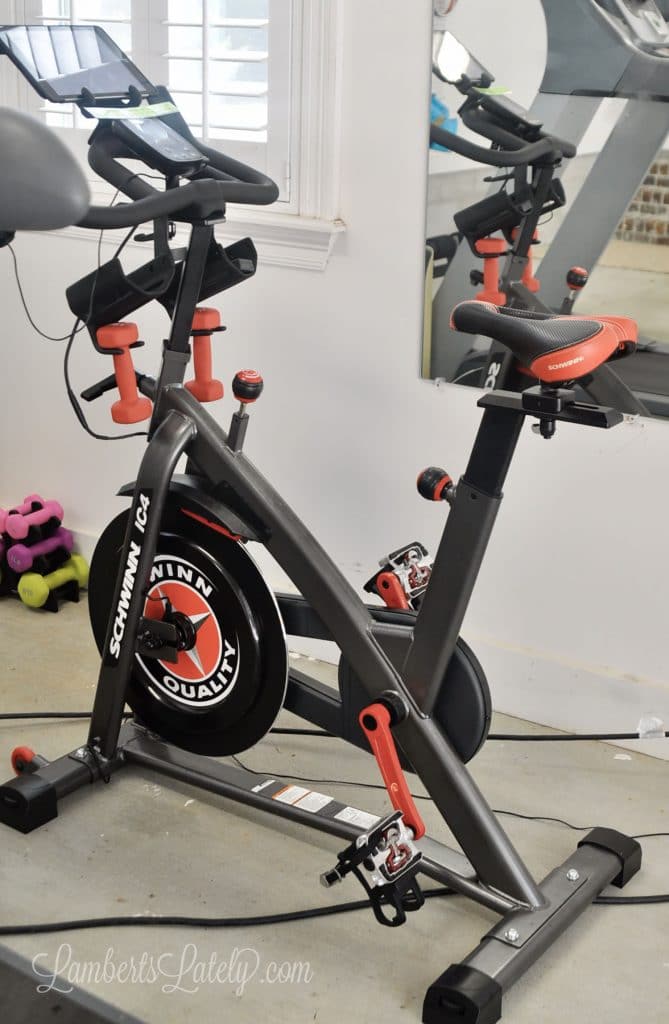
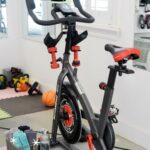
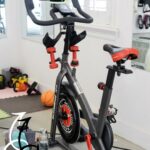
- Schwinn IC4 - $999
- Spin Shoes - $99 (There are lots of options out there, just make sure they're SPD-compatible.)
- A bluetooth-friendly tablet - around $200 (I use a generation 5 iPad that we've had for years - it's not required, but I highly recommend an iPad for this, as a lot of the details I show on how to setup this system are based on Apple features.)
- Peloton app - $13 a month - ok, so this isn't an entirely DIY Peloton setup. You have to at least have a Peloton app subscription for this to work! But it's not expensive at all ($13 vs. $40 per month that you'd pay if you have the actual Peloton bike) and there are so many workouts available - trust me, you'll never run out. I also love the metrics you get through the app!
- MPaceline App - $26.99 a year - in an older version of this post, I recommended the Kinetic app. It's still a great free alternative, but I totally think the MPaceline app is worth the $27 a year for the functionality you get. This app is what's going to allow you to look at your cycling power and cadance/resistance all in one place. It has special functionality built in just for Peloton app users!
So, you can see that if you're doing a DIY Peloton dupe setup with the minimal amount of equipment, the entire set-up can be around $1000 - less than the $1300+ you're paying for just the Peloton, and definitely less than the additional $40 a month you're going to pay for the membership.
Optional, But Recommended Equipment:
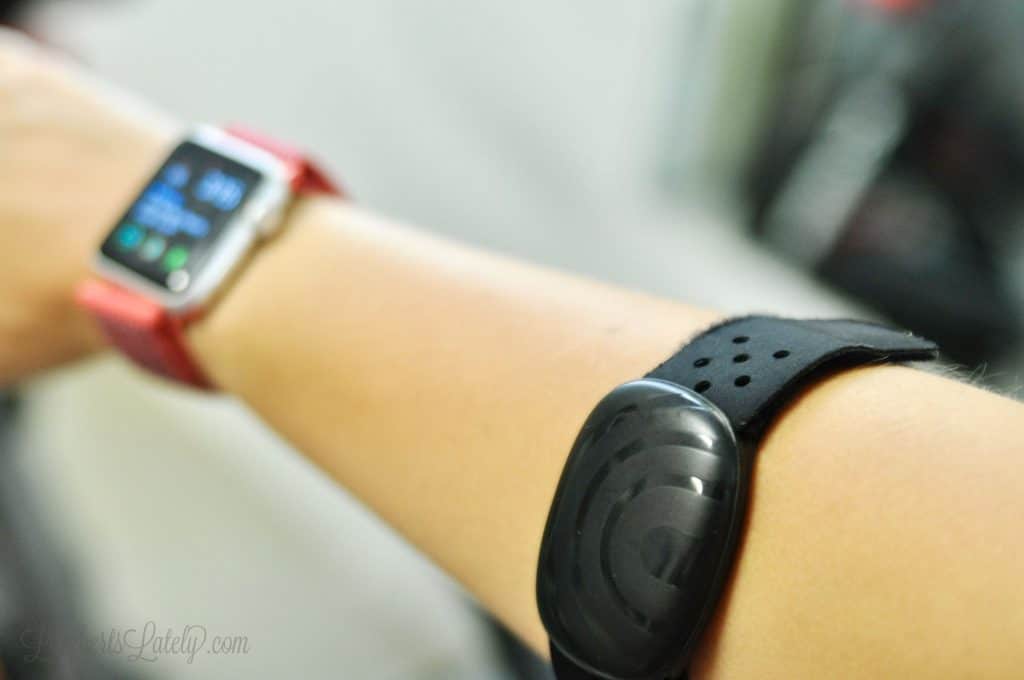
- Apple AirPods Pro - this was another purchase I made shortly after I bought the bike that has been so, so worth it. The pro version is the only one that's sweat-resistant, so they're the only ones I'd use for exercise. Again, AirPods aren't required, but they work so well with Apple products and make it easier to connect everything in the set-up I'll show you.
- AirPods Ear Hooks - the only complaint about the AirPods is that they tend to slip out of my ear when exercising - this was an easy fix!
- Apple Watch - this is how I get my heart rate into the Peloton app. Not required (there is a way to do it with the included Schwinn heart rate band), but with Peloton, it automatically picks up that you're doing a workout and switches on the heart rate monitor, which is nice!
- Streaming TV - we put a TV in our gym that allows us to watch TV while exercising or stream workouts from the iPad. Again, there are lots of options in this category - they only thing I'd recommend is to have a TV that features the ability to airplay. If you have a TV without airplay, there are other options available. Some people use a Chromecast, or there are apps that allow you to stream from an Apple product to a Roku/Fire TV.
- Treadmill of your choice - we have a Precor C956i, but really anything will work if you're not buying a Peloton Tread. For years, there weren't many options available for turning another brand of Treadmill into a Peloton-style setup - but I think I've figured out a pretty close alternative to the Peloton Tread!
- Cooling towels - someone in a workout Facebook group recommended these and I love them! Very needed if you exercise in a hot garage.
- Yoga blocks - really the only required (in my opinion) item for a Peloton yoga class. There are some where straps or blankets are needed, but I've found you can make do with things you already have for those.
Technology Pre-Checks
Most of what I'm going to explain in this post is only possible through Apple products. The apps and features on Apple totally make this possible!
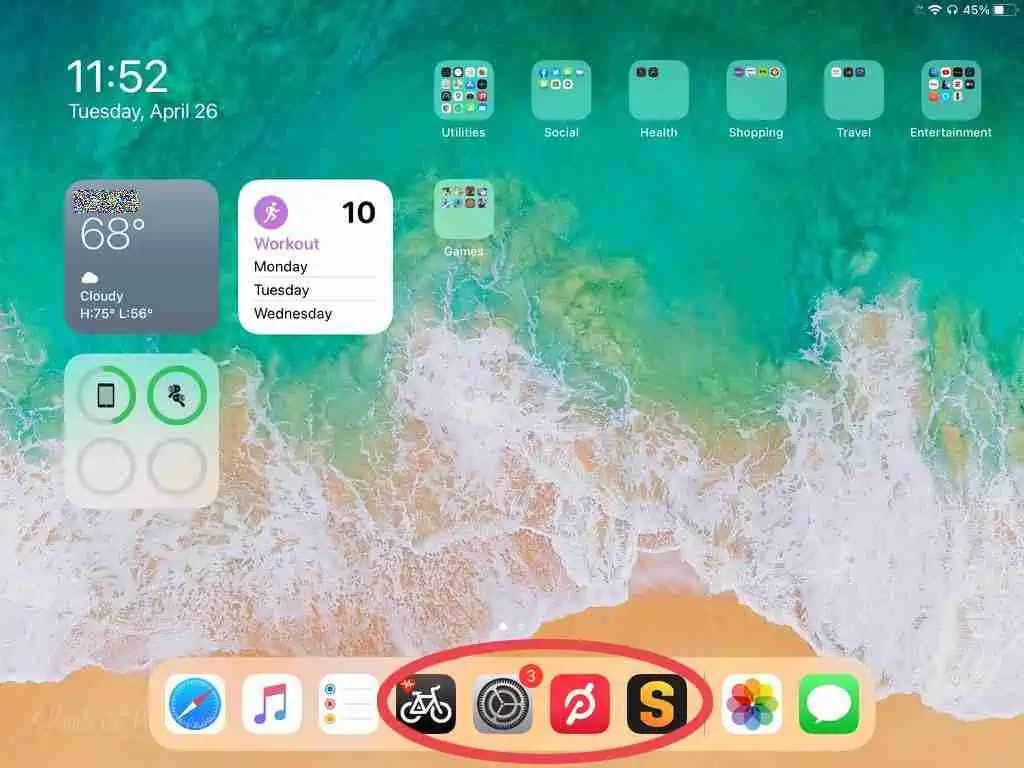
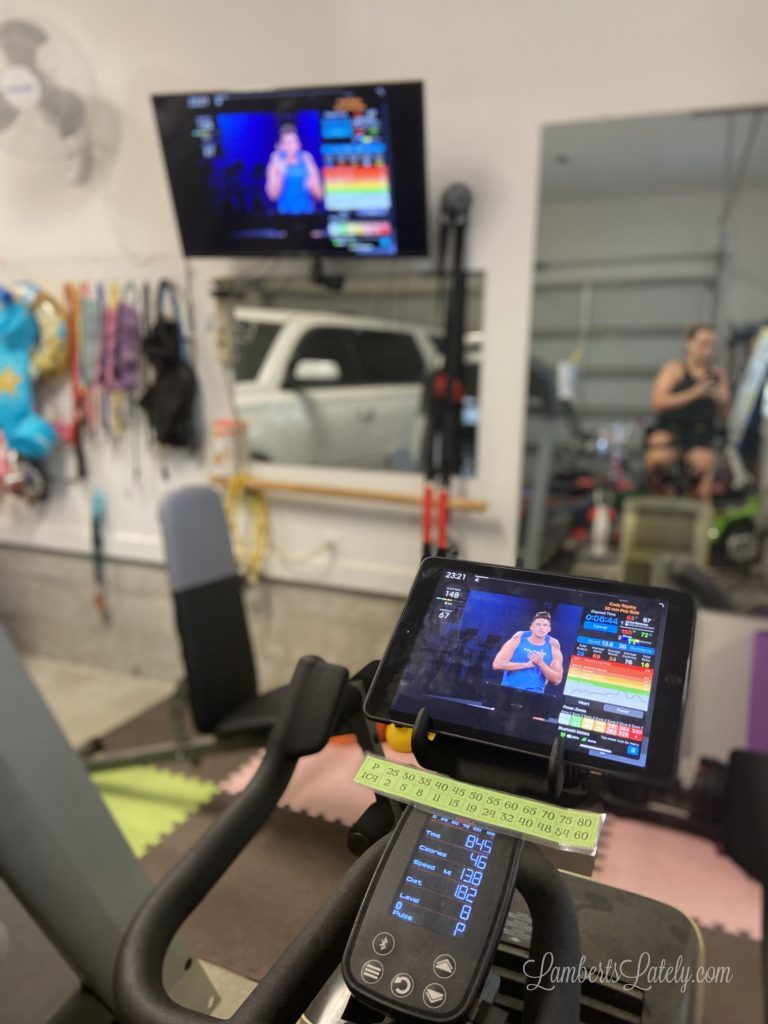
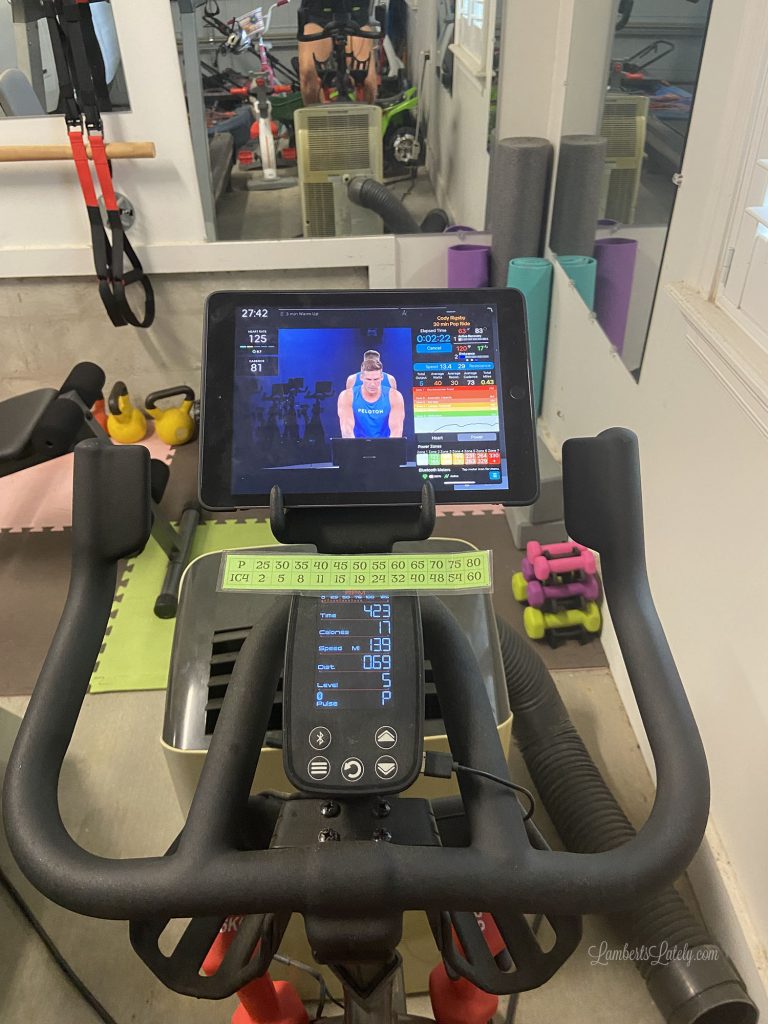
A little bit of housekeeping is important before you dive into the workouts. Since we mostly use this older iPad for Peloton workouts, I put the Peloton app, the Mpaceline app, Stryd app (more about that in Thursday's post), and the settings app in the bar at the bottom of the page. This allows for quick access to the apps I use the most.
You'll need the following apps downloaded:
- Peloton (iPad)
- Mpaceline (iPad)
Make sure all of the bluetooth components are connected to the apps where they're needed. You'll need to make sure...
- AirPods are connected to the iPad
- The IC4, Schwinn heart rate band, and your Apple Watch (optional) are connected to the Peloton apps (if not using the Apple Watch, you can connect the heart rate band that comes with your IC4)
- The IC4 and Schwinn heart rate band are connected to the Mpaceline app, as well as your Peloton account. This can all be done under settings in Mpaceline. You can also go on and connect other apps like Strava if you'd like to save your workouts there.
Setting Up Your Schwinn IC4 as a Peloton Dupe
This is a process that's going to vary for each and every person. No two bodies or bikes are the same - so, while my settings are a recommendation, you really need to calibrate your own bike!
The first (and easy) step is to adjust your seat and handlebars to your body size. The general recommendation is to set your seat height to the upper part of your hips when standing next to the bike, with your handlebars being the length from your elbow to fingertips away from your seat. If you want to get more accurate, you can measure your inseam to set your seat height.
Step 1: Calibration
I said I'd talk about the differences between a Peloton and an IC4, and this is probably the biggest one. It *is* possible to get similar resistance levels, you'll just need to see what those levels are on your bike. (And from my experience, almost every bike is a little different.)
First off, you want to make sure your bike is calibrated properly. You should be able to pedal very easily at a resistance of 0 (if not, make sure your brake isn't still engaged from shipping by pushing your resistance knob down hard and pulling back up).
Set your resistance to 0 and pedal at 50rpm - you should be going 5mph. Set the resistance to 25 and pedal at 75rpm - you should be going 23mph. If your readings are off, you might need to recalibrate (there's lots of info on doing that if you google).

Step 2: Calculate resistance levels
As long as that looks good, it's time to figure out what your equivalent DIY Peloton resistance levels are! (Note: if you're using the Mpaceline app, figuring out DIY Peloton resistance levels isn't necessary - the app automatically does it for you. It is a nice way to get to know your bike though.)
Here's how to measure your resistance levels...
- Open the Kinetic app, connect to your bike, and start a ride (so you'll be able to see your output level and exact cadence).
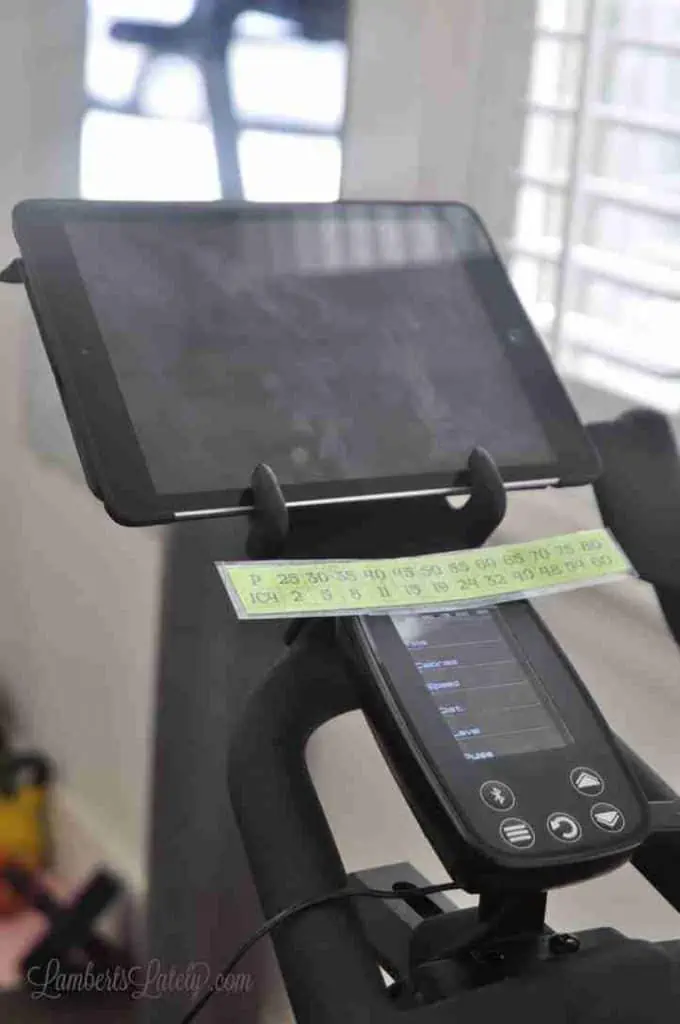
- Use this chart to see what your output level should be at certain resistance levels. For example, this chart says that at a Peloton resistance of 30 and a cadence of 80rpm, my output number would be 61. Pedal at 80rpm and adjust resistance until you get an output of around 61...that's the IC4 Resistance number that's equivalent to 30 on a Peloton. For my bike, that's a resistance of 5.
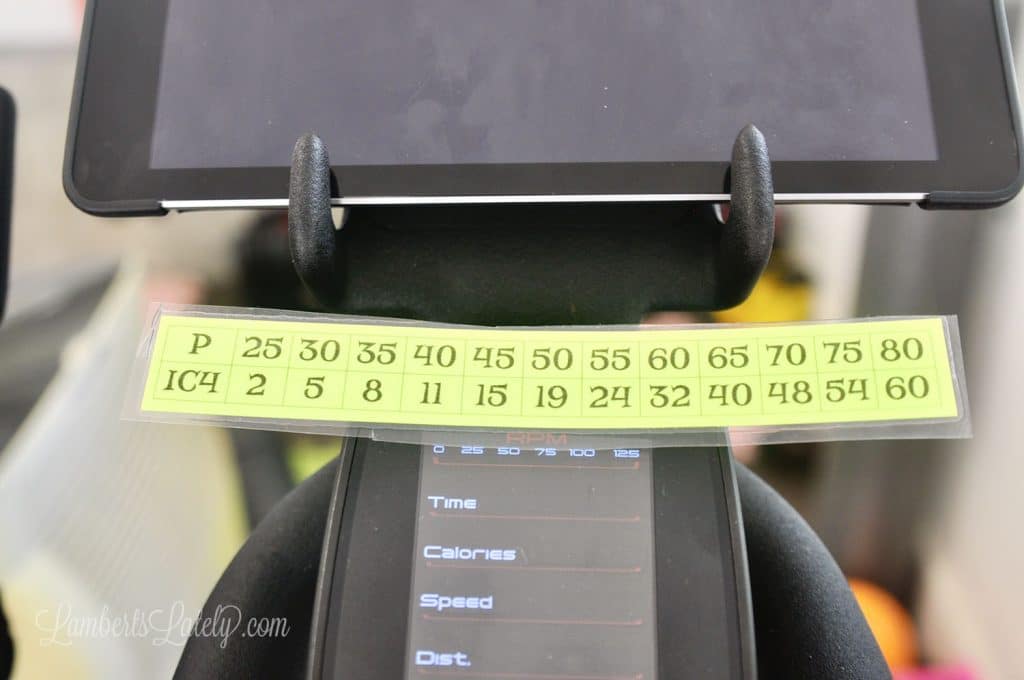
You'll want a pen and paper handy to write down your numbers. I printed this out on card stock, put packing tape on either side to "laminate" it, and taped it to my bike for easy reference. You'll eventually kind of learn the equivalent numbers, but this helps a lot at first! Again, you can use the numbers you see from my bike as a jumping off point, but almost every bike is different - I really recommend checking your resistance yourself.
(NOTE: I also have post that goes into way more detail on converting resistance from Peloton to IC4 if you're using the Kinetic app!)
How to Start a Peloton Workout
This is a step-by-step look at how to start your DIY Peloton workout on a Schwinn IC4 each time. There are a few steps each time you start, so this seems like a lot, but you really get used to them after awhile.
- First, put in your AirPods and put on your Apple Watch (totally optional) and heart rate band that comes with the IC4. Turn on the heart rate monitor (you'll need to connect this to the MPaceline app; that's what the heart rate monitor is for, but you can use it on both apps). If you're using an apple watch as well, it should automatically connect to your Peloton app; if not, open the Peloton app on your watch to kind of "encourage" it to get going. After that, it should pick up when you start a workout on either your phone or iPad (it doesn't always though).
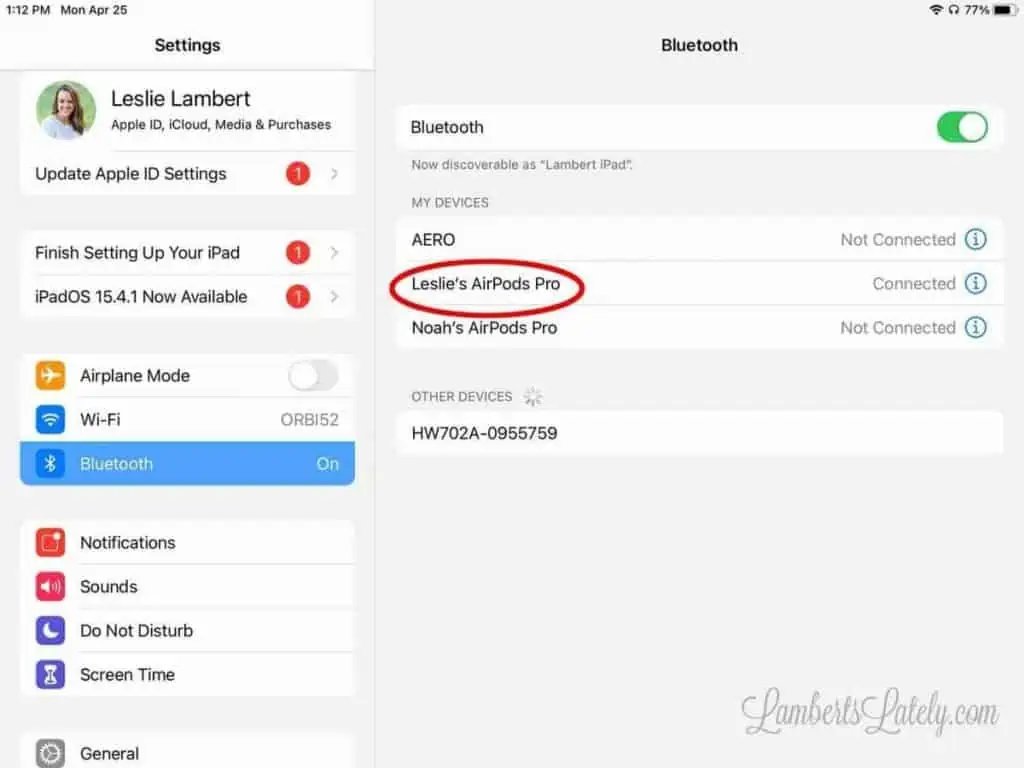
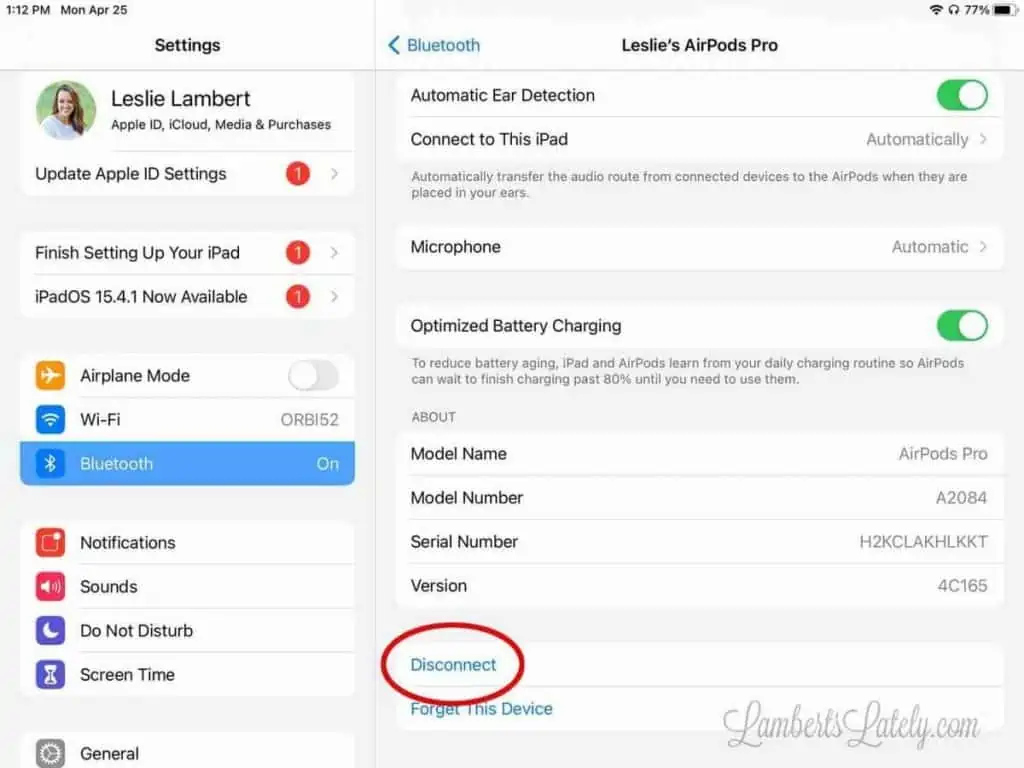
- (Only needed if you're Airplaying your workout to a TV.) This is weird - but disconnect your AirPods from your iPad if they're connected. This little trick is how I get my AirPods to play the TV sound while I'm streaming to the TV. To do this in your iPad, go to settings, bluetooth, click the "i" next to your AirPods, and scroll down to the bottom to select disconnect.
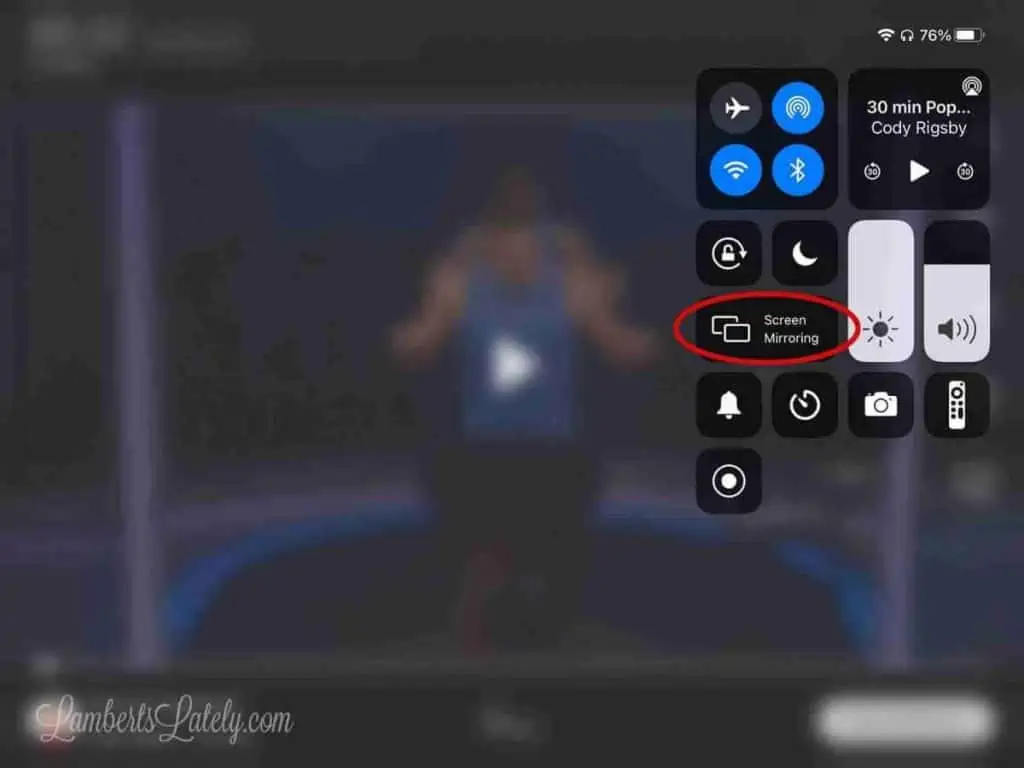
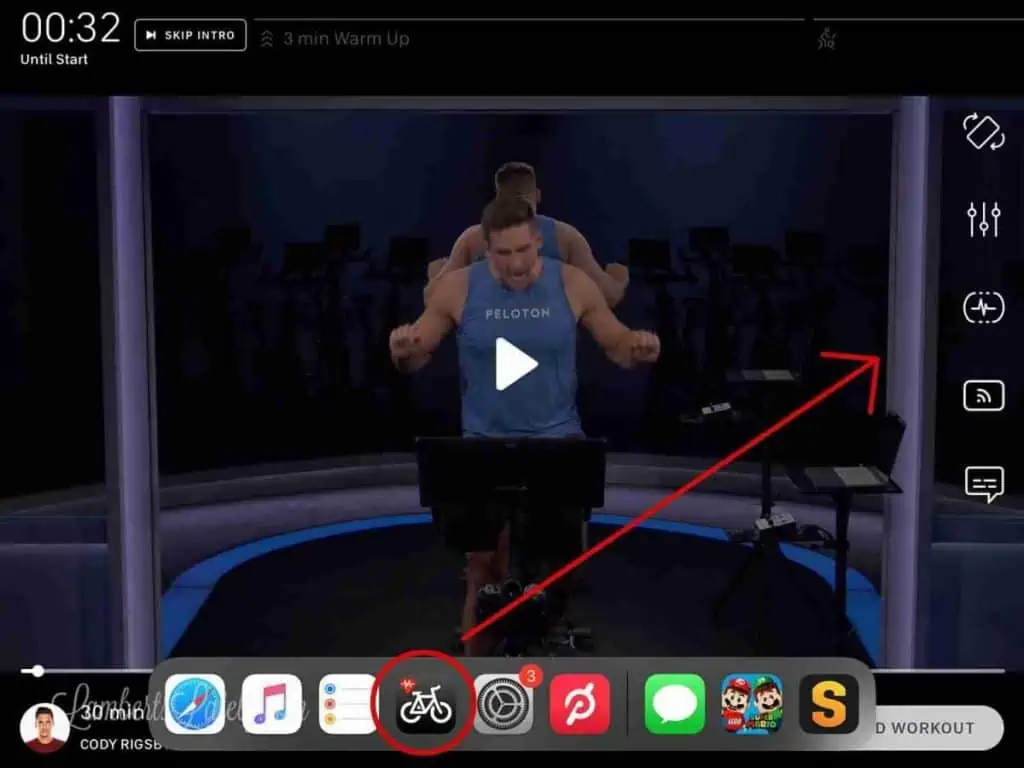
- Start your workout, then start airplaying your iPad to your TV (this isn't absolutely necessary, but I like having a bigger screen, especially for things like bootcamp workouts where you're on and off the bike). You do this by swiping down from the top right of your iPad, clicking "screen mirroring," and selecting your TV.
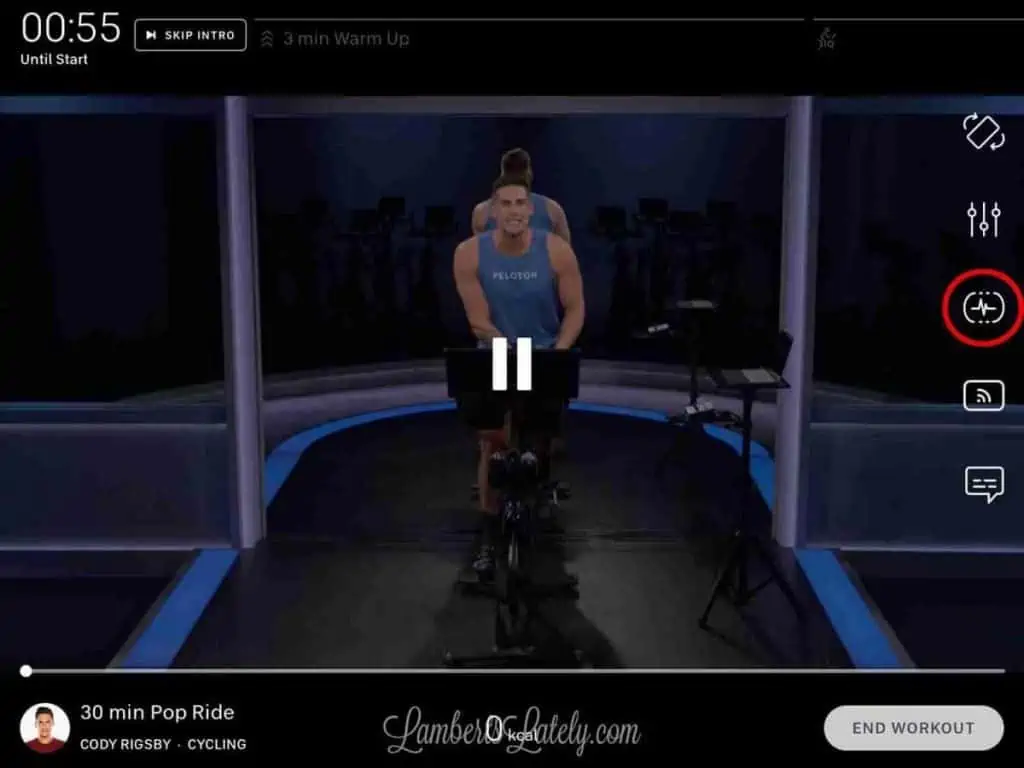
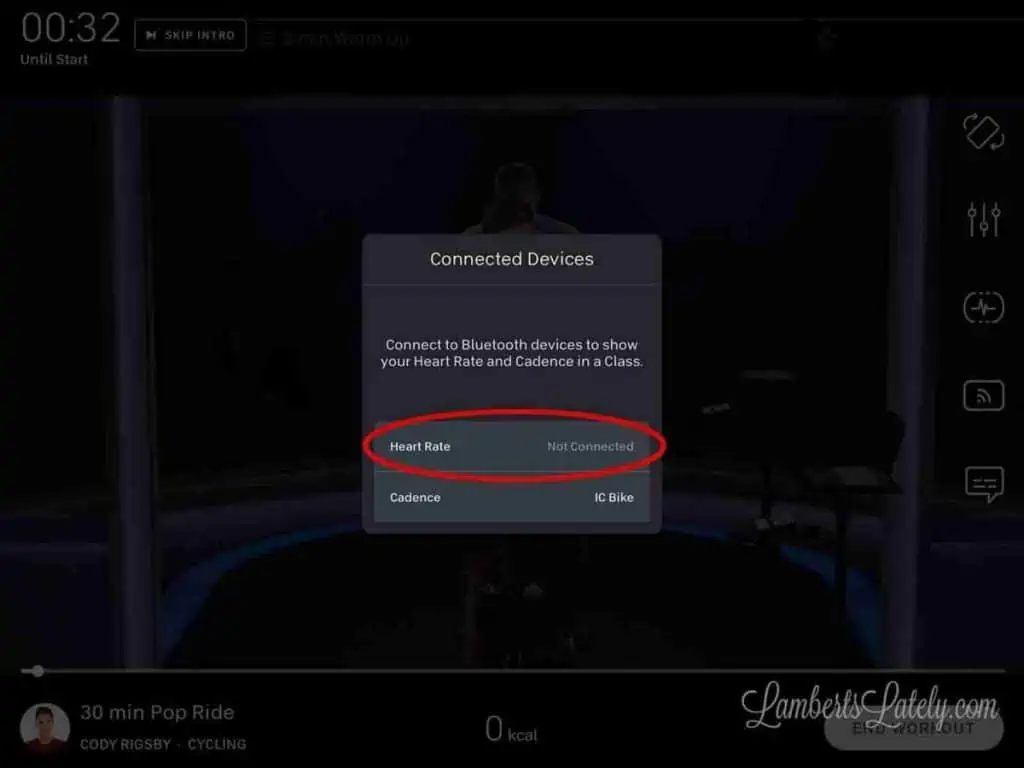
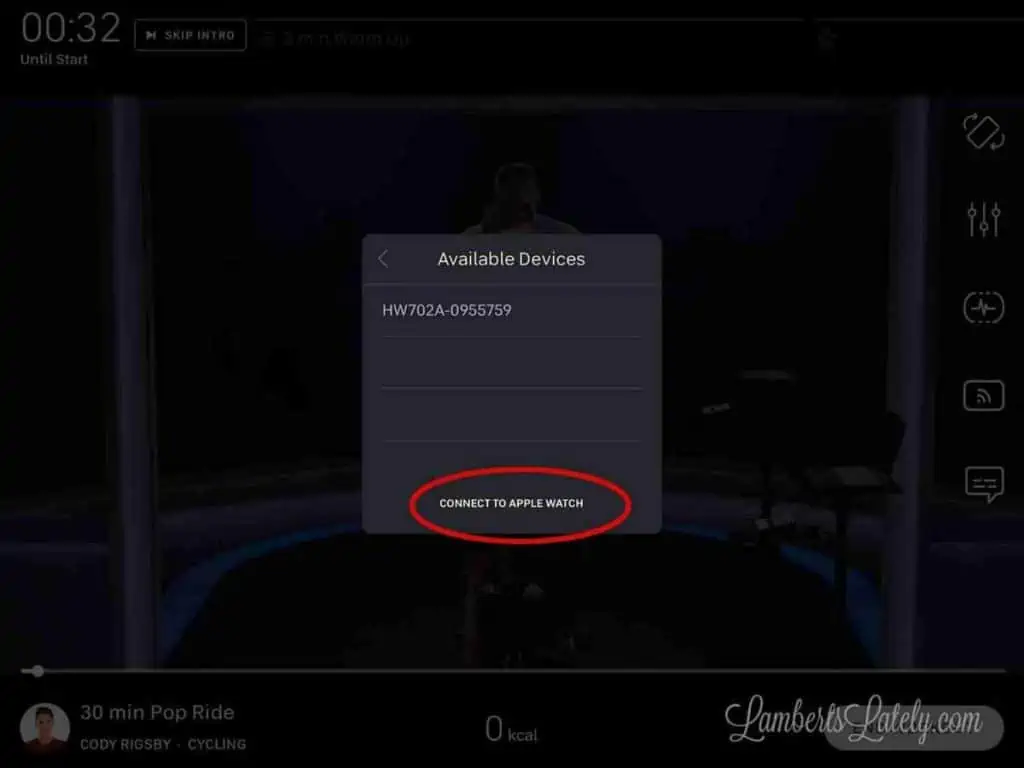
- Click the icon on the right of the Peloton screen that looks like a heart rate to make sure both the IC4 and the heart rate monitor or Apple Watch are connected to Peloton (sometimes they connect automatically, sometimes they don't). Very important - you have to connect the bike/heart rate monitor to the Peloton app before Mpaceline for them to work on both apps at once! Because you're using the Peloton app to run your apple watch in this setup, it won't work with Mpaceline.

- (This part is only needed if you're streaming to a TV and want to send the audio to your AirPods.) Click the streaming icon right below the heart rate connection icon on the right hand side of the Peloton app. With your AirPods disconnected, select your AirPods in this drop-down. After doing this, your iPad should keep airplaying to the TV and the audio comes to your AirPods! It took me weeks to figure out this trick. 🙂
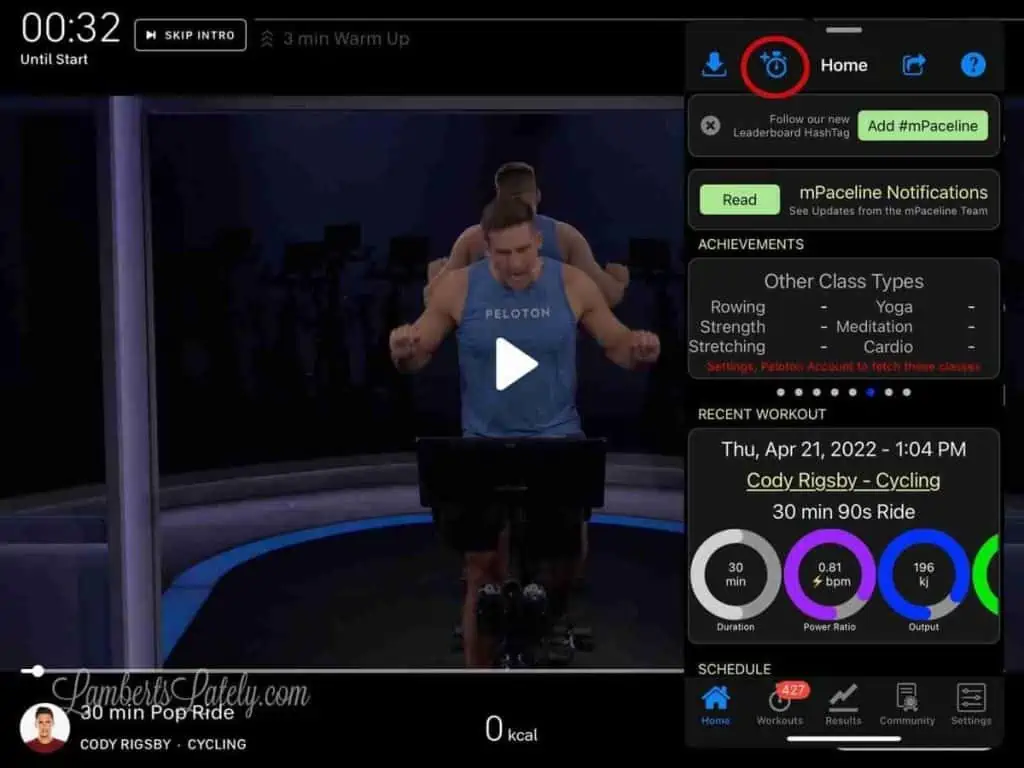
- Now, swipe up a little from the bottom of your iPad to show your frequent apps. Use your finger to pull Mpaceline up to the right side of your screen. Click the second icon on the top of Mpaceline and you should see your workout already playing in Mpaceline if you've connected your Mpaceline account to your Peloton account.

- At this point, if your heart rate band and/or bike aren't connected to Mpaceline (indicated by both meters at the very bottom showing green), click those three lines at the bottom and click "connect meters."
And you should be off and running on your DIY Peloton ride! I know that sounds like a lot, but it really does become second nature after awhile (and several of these things are totally optional. You can definitely still do a workout without doing them).
Quick Setup Summary
- Put on heart rate band and apple watch
- (Optional - if using a TV to stream) Disconnect AirPods from iPad
- Start Peloton workout
- (Optional - if using a TV to stream) Start TV streaming
- (Optional - if using a TV to stream) Connect AirPods to Peloton app
- Connect bike and Apple watch/heart rate monitor to Peloton app
- Start Mpaceline app
- Check to make sure monitors are connected to Mpaceline
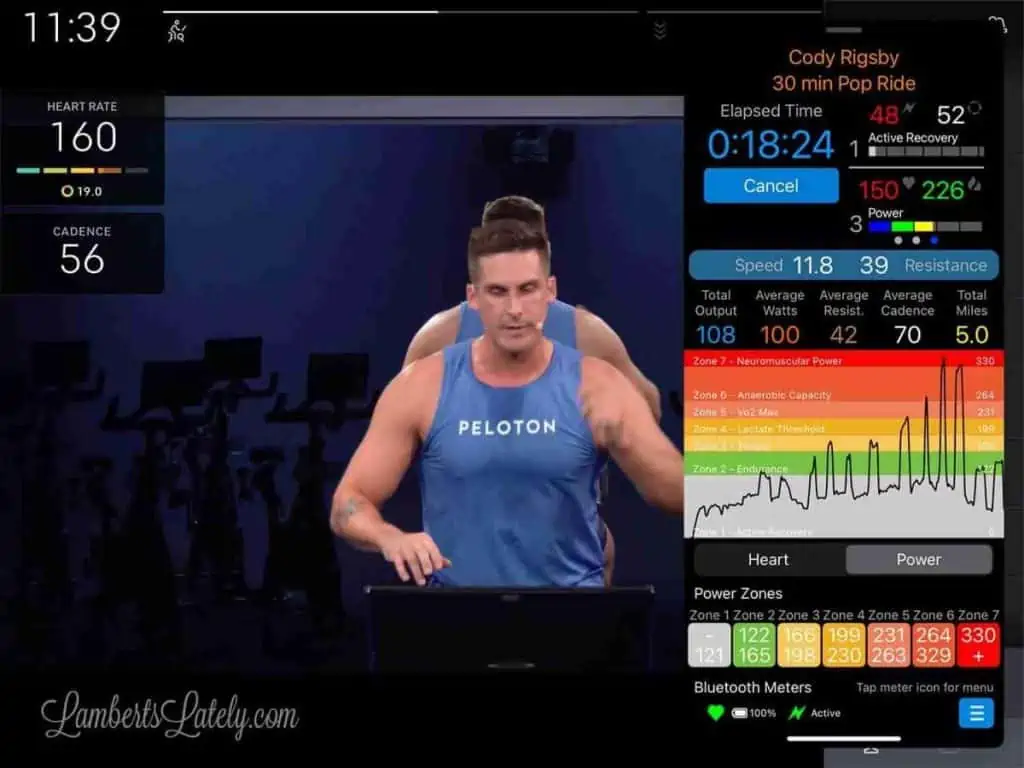
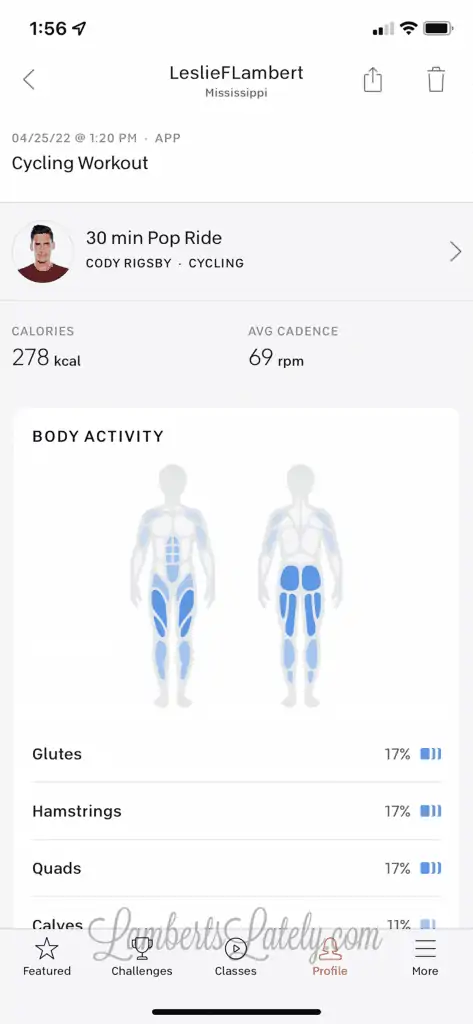
This is an actual screenshot from the middle of that ride - you can see my power graph, total output, heart rate, cadence, speed, and even calculated resistance in the Mpaceline app.
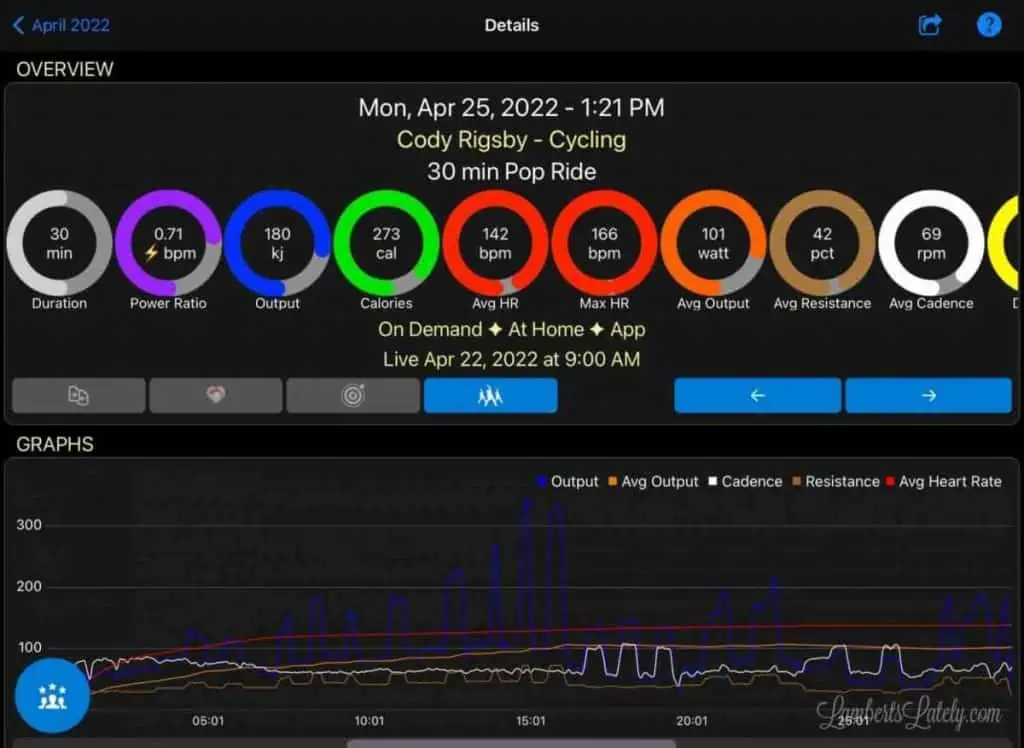
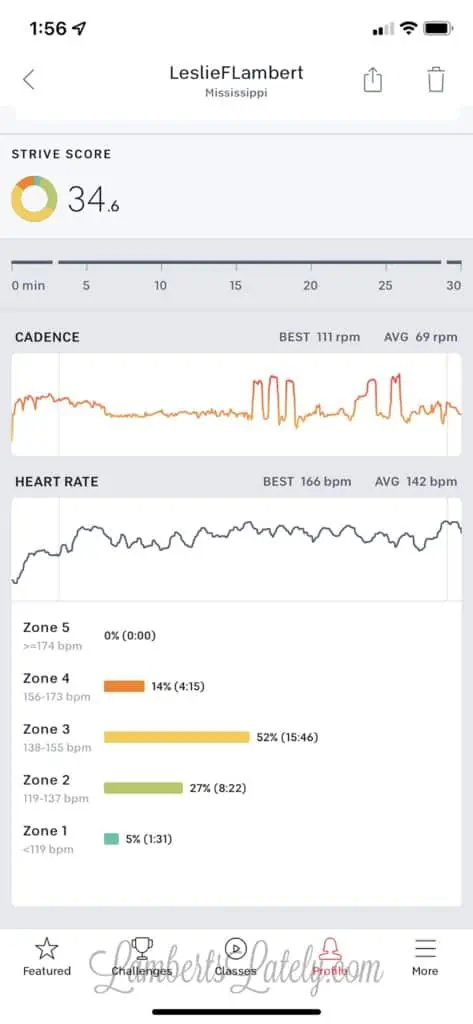
Here's what my stats from both the Mpaceline app and the Peloton app look like after the ride. All of the info you could want about your output!
That was a LOT of information - I know. But, once you get the routine down, you won't miss the real deal one bit! The IC4 is one of the best purchases I've ever made - it's been a life-saver for both my physical and mental health throughout the pandemic, and it's something I can see myself using for a really long time.


Leslie Lambert is a lifestyle writer and content creator specializing in home organization, family recipes, and intentional living. With 17 years of experience in blogging and digital storytelling, she helps busy women create calm, purposeful homes they love.


Hi!
I have an IC4 bike and regularly use the Peloton app. I have been using the commonly circulated IC4/Peloton conversation chart that just goes up to 50–I got it off Etsy and have also seen it on Reddit threads. However, the numbers still seem way too hard! Your conversion chart looks more realistic. Do you think that chart you made would work better with my bike? Any insight you have would be great!
This is the chart I’ve seen around on Etsy/Reddit and have been using....Peloton (IC4): 25 (5) 30 (9) 35 (17) 40 (25) 45 (33) 50 (49). I haven’t found any other chart, this one seems to be the one used but it still seems pretty difficult.
Thanks!!
I definitely think so - I tried that same chart at first and it was way too much!
I’m so glad to hear this. I’m a total beginner and thought I was a major wimp until I used the Kinetic app. Thank you!!!
Hiya! This post has been super informative. Thanks! I recently got the bowflex equivalent to the ic4 & found the conversion chart off, especially as the resistance gets heavier. One question I have though is how do you get the calculation of output from the kinetic app. It’s not super clear to me up above. Thank you!
The resistance is going to really be a little different for every bike - that's why I'd encourage doing the output test. I'm thinking about doing a post that goes into detail about how to get your proper resistance levels - I'll try to get that up in the next couple of weeks!
Hi and thank you for this post! I am wondering how you get your AirPods to work while streaming to a tv from the iPad or iPhone. I tried this today and when I start mirroring to the tv the AirPods stop and sound goes directly to the tv.
thanks again!
Hey there! This is kind of strange, but it works: make sure your AirPods aren't connected to your phone (in settings), then mirror your phone to the tv, then (through the peloton app) click on the streaming button in a workout (looks like 3 curved lines) and select AirPods. That should send the sound to your AirPods and keep the streaming on the tv.
Hello and thank you for this post. I ride an outdoor bike quite often, but when I tried Peloton beginners ride, (using the peloton numbers on ic4) I thought I am gonna faint. After reading your post, I did calculated my numbers with the power output chart from peloton. But there is only short scale 30-50. Can you post the complete power output scale that you have, as the link you provided does not work. Thank you!
Hi there! I have a new post that walks you right through this process...here's the link: https://lambertslately.com/how-to-convert-peloton-resistance-schwinn-ic4
If I have an Apple Watch can I use that for both the Peloton App and the MPaceline App instead of the heart rate monitor that comes with the bike? Or do I need both?
Unfortunately, you can't. You're running the Peloton Apple Watch app, so it won't send the heart rate to Mpaceline too. I just wear the heart rate monitor that comes with the bike to get the heart rate in MPaceline.
I’m struggling to connect my Apple Watch HR to the peloton app on my iPad. The watch keeps telling me to open a peloton class on my iPhone. I really want to use the iPad though so I can also have mPaceLine open. Any suggestions?
With the Apple Watch, you're not so much connecting it to your iPad as to your Peloton account. When you start a peloton workout on the iPad, it should recognize that your peloton account started a workout and start up the HR monitor. Sometimes I have to manually open the Peloton Apple Watch app after starting my iPad workout to get it going.
Hi! I am trying to do Power Zone rides on my IC4 and want to see the output and ideally the Zones for my output. I receive zones for my heart rate. You make reference to the Kinetic and MPaceline app, both of which have mixed reviews in the Apple App store. Before finding your article, I downloaded the Power Zone app, but am underwhelmed by it. Please advise. Thank you!
I still highly recommend Mpaceline! It will show zones one they are added in settings.
I followed your instructions, but I am not getting the screen on mpaceline showing my Peloton workout, let alone the heartrate and cadence. Note that I do not have an Apple watch. My setup - iPad with Peloton and Mpaceline Pro app; Schwinn ic4 with Schwinn heartrate monitor. The Peloton app shows my heartrate and cadence from the bike, so it is connected. Any help with the set up will be appreciated.
The software setups can change occasionally, and I haven't used it without an apple watch in a long time, so I can't speak to how it's working with the schwinn heartrate monitor now. Have you tried making sure the heartrate monitor and bike are connected to mpaceline before connecting to the peloton app? That's a must - if you connect to peloton first, for some reason it doesn't work with mpaceline.
Do I need mpaceline pro sync or just the pro to get it to work with a Schwinn ic4?
I believe it's just Mpaceline pro!